This is a project for a (fashion, not underwear) corset inspired by the weird pointy shapes you see on insect wings. I wanted to do different shapes in different fabrics, essentially throwing everything I know about corset pattern drafting out of the window. This gallery is a diary of the progress I made.

I started out with a traditional 6 panel corset pattern that I had sitting around from previous corsets I made. I knew this would at least fit me pretty well. I made a muslin mock up of this and put it on. 
When I’d put it on, I doodled the shapes I wanted on one of the sides with a sharpie. This is a very exact science obviously. When I was pleased with the design I cut the fabric apart along those lines to form the basis of the new pattern. 
I traced around the cut-out pieces of fabric (making sure I also made some marking of where they should connect to each other). Some of the pieces wouldn’t lay flat right off the bat, which makes sense because some of them were in spots that on the original corset had curved seams and were therefore, well, not flat. It took some creative cutting and transfering of seamlines to get it all to add up. I smoothed out the shapes a bit more and ended up with this pattern. 
I stitched together a muslin for one corset half with the new pattern. It’s a bit more of a struggle than the original because due to the weird shapes, many seams are not even close to symmetrical. So there is a lot of stitching concave to convex curves and general wiggling into place of shapes that don’t really want to exist. 
I compared the original corset (on the left) to the new (right) half to check that the fit hadn’t changed too dramatically. Looks pretty decent. So it’s time for the real deal. 
The fabric I want to use on the outside of the corset is this shimmery taffeta in three colors. I will alternate the colors so the shapes of the pieces really stand out. 
I put some strong fusible interfacing on the back of the fabric to stabilize it a bit, and then cut my pieces. I’m used to cutting a very exact 1.5 cm seam allowance and then measuring back from the edge of the fabric to work out where to stitch. But with all these weird shapes I suspect that that’s not going to line up very smoothly and I decide to mark my stitch lines with tacking thread instead. I hate it and it takes forever, but it’s probably going to help preserve my sanity later on. 
I also added some colored markings to show where two adjacent pieces line up (blue) and where a piece meets the seam between two other pieces (green). 
The inside of the corset is traditionally coutil. For this one I’m using a slightly thinner herringbone-weave fabric, because it’s not as sitff and therefore easier to get into the annoying seams that I want. More cutting, tacking and marking… 
And so it begins. All the tacking is done, and I can start actually assembling the corset. 
I’m poking pins straight through the specific position markings to line them up. This helps while I shift the fabric around to match up the full seam line: If the pin is sticking out straight, the points are still lined up. If the pin is pointing off to the side the layers have shifted relative to each other, and I wiggle the fabric back until it is lined up straight again. 
I trimmed the seam allowances down after stitching the seams, and cut some vents into the curve so I could iron it flat. 
Ironing is annoying but pressing every seam as you go along is 80% of the difference between an item looking homemade and handmade, so here we go. 
And part number 3 added. This was a bit rougher than 1 + 2. 1 and 2 both have convex curves which came together pretty easily. But 2 + 3 means a lot of sitching concave to convex curves. It was hell to pin, and then some of the stitching was still off and I had to redo it. So from now I will be basting these kinds of seams instead of pinning them. 
I know I said I was going to baste everything, but I was wrong. The basting thread turned out to get pulled out of place by the fabric trying to revert to its original shape. So back to pinning with the fury of a thousand…pins. 
Slowly but surely. 5/9 pieces assembled. 
The 3D shape is becoming visible. 
The two halves of the outside now fully assembled. I have to say it was a smoother experience than I expected. I did spend a lot of time pinning, but it paid off in getting most of the seams right on the first try. I only needed to unpick and redo a handful of sections 
For the inside layer, I’ve now ironed all the seam allowances to one side, and top stitched through them to reinforce the seams. I’ve also added a ribbon at the waist line for extra strength. 
Then I put in the boning channels. 
The top stitching and the boning channels as seen from the good side. 
I’m using 7mm spiral steel for most of the bones, cut to length and then tipped with those end caps you see in the middle. The center front and center back will have flat steel. 
After stitching the inside and outside parts together along the center back, it’s time to put some eyelets in and try it on. Unfortunately the fabric at some points is very thick, due to having a ton of different layers meeting at one point. It was a real pain getting the those eyelets in, and I hope they hold up. 
I pinned the top and bottom edges together so the fabric wouldn’t shift, and now it’s time to try it on and see whether all my efforts to get this accurately lined up actually did anything. 
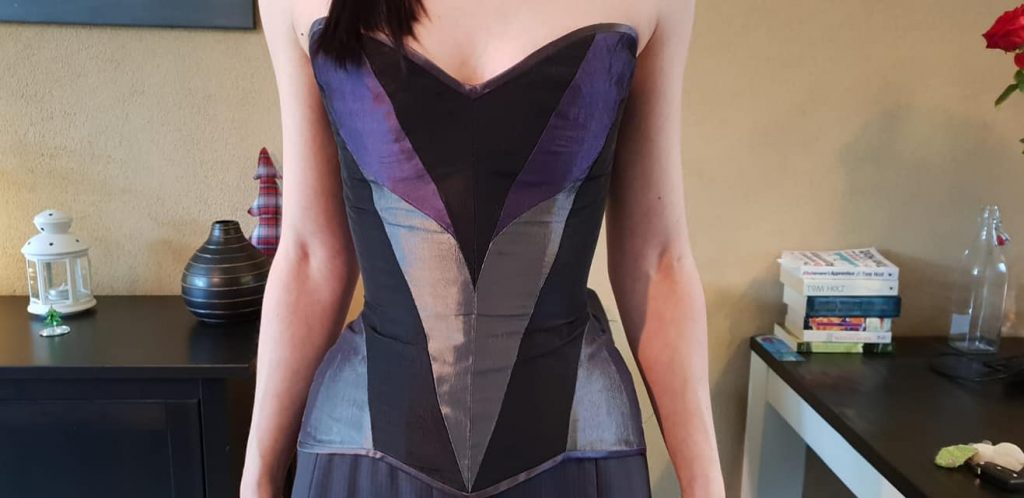
Oh shit! This is better than I thought it was going to be. It sits very smoothly almost everywhere, and with the fabric pulled tight it looks so much shinier than in its usual frumpy state. I have zero regrets about spending hours and hours getting this right. 
There is some horizontal wrinkling, especially along the waist. This is kind of to be expected with the tension on the fabric (unlike diagonal wrinkles, which indicate fit issues) but I went back and let the seam between the purple and the two panels in front out a little bit on the outside layer only to ease this a bit. I’m also going to stretch the outer layer a bit when attaching the top and bottom edges together to hopefully pull some of the wrinkes out. 
Time to clean everything up before closing the top and bottom. The basting/tacking thread I used so far was a cool water soluble kind. I like to stitch exactly on my markings because I want that accuracy, but that used to mean it was very annoying to pull the stitched down white little threads out later. Now I just threw the whole thing in the sink and they’re gone :D. I made sure to baste the top and bottom edge with non-soluble thread so that didn’t wash out. Now it needs to dry. 
To finish the edges, I’ve folded bias tape open and pinned + stitched it just inside the intended edge. Some of the curves were a bit of a challenge. 
After stitching one side I trimmed the excess fabric away. On the inside I hand stitched the other side of the binding. Using a ladder stitch to make it pretty much invisible. 
Using some leftover scraps I made a modesty panel (flap) to go behind the laces. It’s stiffened by putting a craft foam rectangle inside. Then it was ready to be laced up! 
Aaaaaand the end result. It wrinkles a bit more than before somehow. If I ever get around to it I plan to hand stitch through the seams to get the outside more evenly attached to the inside. But for now it will have to do. I still think it looks pretty cool. 